My Hands-On Experience with this Buck Converter Pack
If you tinker with electronics, Arduino boards, or 3D printers, you already know the struggle of stepping down power. I recently needed to power a 5V Raspberry Pi setup from a 12V marine battery. Normally, I would just wire up a standard LM2596 module, pull out my multimeter, and carefully adjust the tiny screw until the voltage matched. But honestly, I was feeling lazy and wanted something faster.
That is when I stumbled across these adjustable DC-DC step-down converters with built-in LED voltage displays. I bought the multi-pack because the value was hard to beat. If you want to see the exact bundle I am talking about, you can grab it on Amazon. After running them through the wringer for the past month, I have some thoughts on what they do well and where they fall short.
The Setup and That Stubborn Little Screw
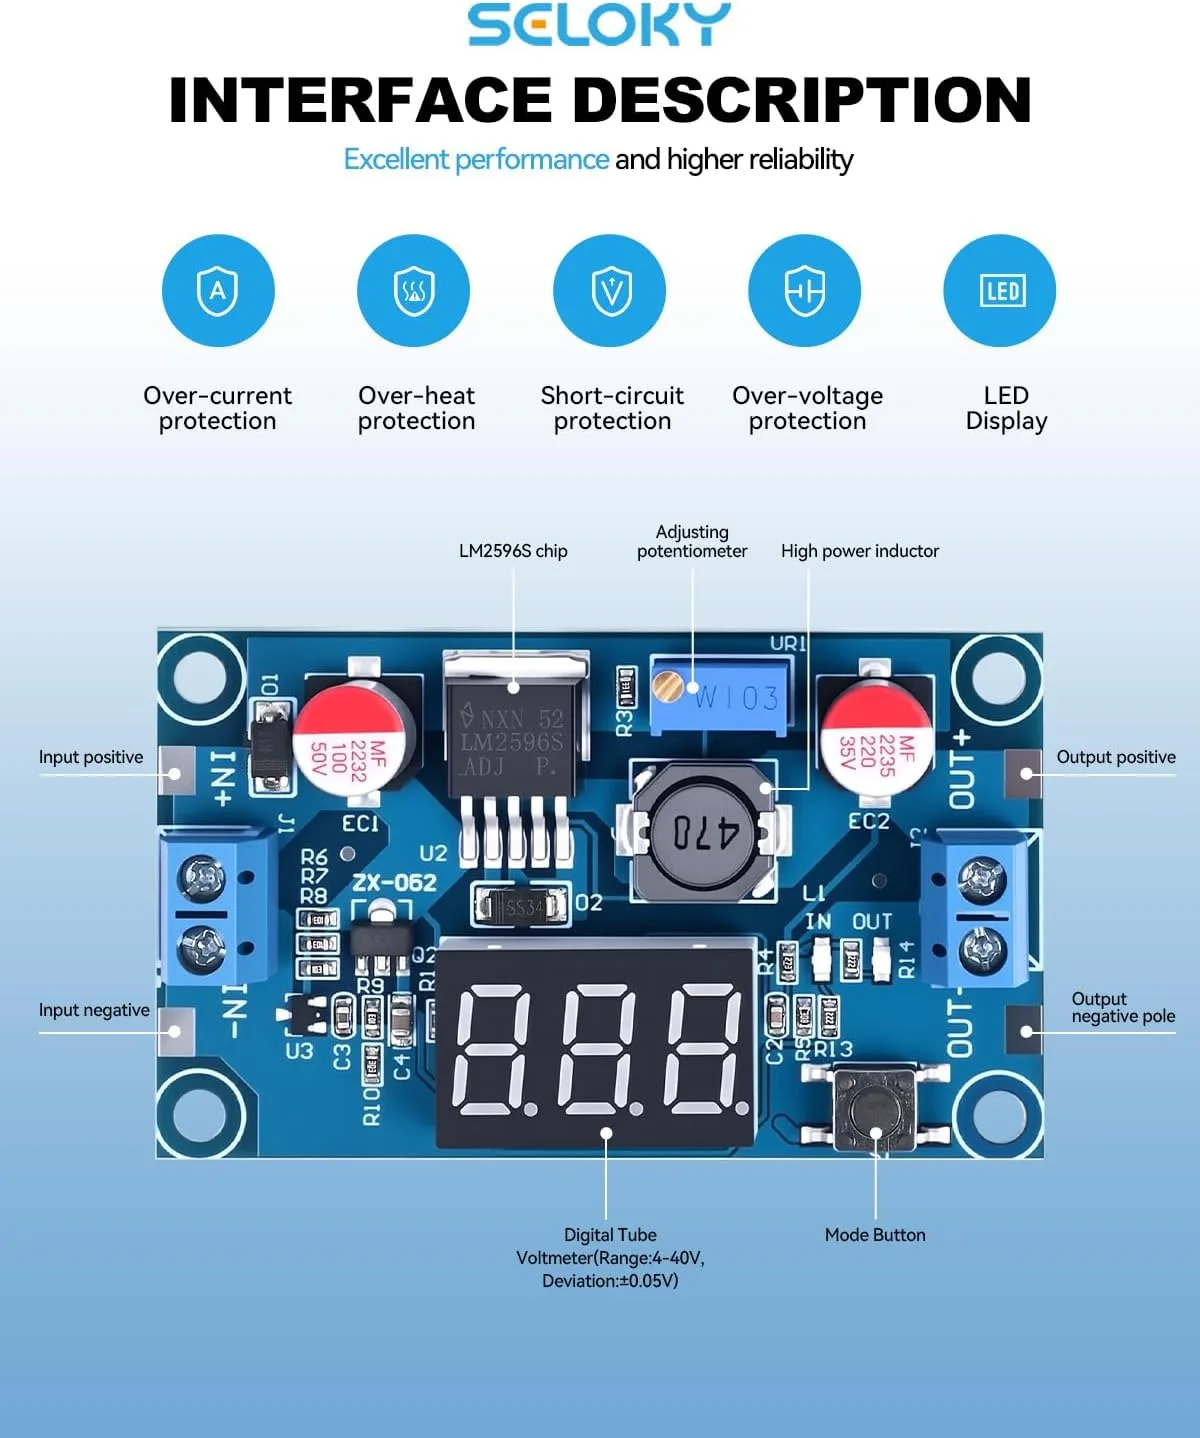
Out of the box, the build quality is pretty standard for budget electronics. The solder joints looked clean, and the LED screen was securely attached. Wiring it up was a breeze because you can either use the terminal blocks or directly solder your wires to the pads. I opted for the terminal blocks for quick testing.
Now, let's talk about the potentiometer—the tiny brass screw you turn to adjust the voltage. When I first powered the unit on, I gave the screw a full turn counter-clockwise. Nothing happened. The display still showed my 12V input. I gave it three more turns. Still 12V. I actually thought I received a dead unit.
Here is the trick: these potentiometers require a lot of turns before the voltage actually starts dropping. I had to spin that tiny screw about 15 times before the numbers on the display finally started ticking down. Keep this in mind so you don't throw them in the trash thinking they are defective.
How Accurate is the Voltmeter?
The whole selling point of this specific model is the built-in LED display. There is a little tactile button next to the screen that lets you toggle between viewing your input voltage and your output voltage. It is incredibly convenient. But is it accurate?
I hooked up my trusted Fluke multimeter to the output terminals to verify the onboard screen. When the module's display read 5.0V, my Fluke read 5.12V. It was consistently off by about 0.1 to 0.15 volts across the whole range. For basic LED strips or a Raspberry Pi, that small variance won't fry your gear. But if you are powering highly sensitive sensors, you will still want to double-check with a real meter. If you are curious about current pricing for the multi-pack, check today's price.
Heat Dissipation: The Real Limit
The product claims it can handle up to 3 amps of output current. I decided to test this by hooking up a load tester. At 1 amp, the board was slightly warm but totally fine. At 2 amps, the main chip got uncomfortably hot to the touch after about ten minutes. I did not dare push it to a continuous 3 amps without slapping a heatsink on it.
If you plan to run more than 15 watts of total power through this continuously, do yourself a favor and buy some cheap adhesive aluminum heatsinks to stick on the main chip, or mount a small cooling fan nearby.
The Good and The Bad
After a few weeks of using these in various projects, here is my honest breakdown:
- The Pros:
- The built-in voltmeter saves so much time during prototyping.
- The button to toggle between input and output voltage is a great touch.
- Includes both screw terminals and solder pads.
- Extremely affordable when bought in a pack.
- The Cons:
- The display is off by about 0.15V.
- The adjustment screw requires an absurd number of initial turns.
- Overheats quickly if pushed past 2 amps continuously.
Who Should Buy This
This is a fantastic buy for hobbyists, makers, and DIYers who need to step down voltage for standard projects like LED lighting, basic microcontrollers, or fan speed control. If you hate dragging out your multimeter every time you need to adjust a buck converter, the onboard screen is a massive quality-of-life upgrade.
Who Should Skip It
Skip this if you are running highly sensitive audio equipment where a 0.1V variance matters, or if you need to power heavy loads (like large motors) that will consistently draw more than 2 amps. The heat buildup will eventually kill the board under heavy, continuous stress without active cooling.
Final Verdict
Overall, I am really happy I bought these. They aren't flawless laboratory-grade power supplies, but they don't claim to be. For the price, they are incredibly convenient little problem solvers to keep in your parts bin. I've already used three of them and plan to order another pack soon. If you want to add them to your toolkit, pick one up here.